You finally managed to reproduce a rare, non-deterministic bug. You even managed to hit a breakpoint at the perfect place to debug the issue. If you could see the function’s arguments and return value it would help you pinpoint the root cause. Unfortunately, the function is in 3rd party framework code and you don’t have access to the symbols files.
What do you do now?
With a little bit of knowledge about how Swift works on ARM64, you can actually figure out what the argument/return values are for any Swift function.
In this guide I will show you how Swift’s calling conventions work on ARM64 for the Int and Bool types. With this knowledge you will be able to read Swift argument/return values in a debugger even if you don’t have symbols files.
In subsequent articles I plan to cover the other primitive types (Float, Double, String) and more complex types (Array, struct, classes, etc).
Before we start exploring how Swift’s calling convention works on ARM64, you will need to verify that you have the right software/hardware, set up an iOS app project, learn how to set breakpoints on Swift functions. Instructions for all of these steps are in this article.
Hardware & Software Requirements
Some of the information you will learn might be different on older/newer versions of Swift. To ensure that you see the same results as me, please make sure that you’re using something similar to the following setup:
macOS Version 10.15.6 (19G73)
Xcode Version 11.6 (11E708)
Swift version 5.2.4 (bundled with Xcode)
Physical iPhone/iPad running iOS 13/14
The Project We Will Use
To get our Swift code running on an ARM64 CPU we will be creating a new iOS app project that you will install onto your iOS device.
- In Xcode create a new project and choose iOS App
- Use the following settings:
- Name: “RevEngARM”
- Interface: “Storyboard”
- Life Cycle: “UIKit App Delegate”
- Language: “Swift”
- Replace the contents of
ViewController.swiftwith the following:
import UIKit

class ViewController: UIViewController {
    override func viewDidLoad() {
        // Add a breakpoint here!
        super.viewDidLoad()

        print(testInt(a: 321, b: 654))
        print(testBool(a: true, b: false))
    }
}

func testInt(a: Int, b: Int) -> Int {
    return a + b
}

func testBool(a: Bool, b: Bool) -> Bool {
    return a || b
}
To ensure you have everything working, plug in your iOS device and try running your app. If you see the print statements in the console, you should be good!
Placing Breakpoints on Swift Functions
When you add a breakpoint to the start of a function with Xcode’s UI, it wont’t actually put your breakpoint on the first instruction of that function. Instead, it actually stops a few instructions after the beginning (I think it tries to skip the boilerplate assembly found in every function).
For our purposes, we need to stop at the first instruction so Xcode’s breakpoints will not work. We will need to set them manually with LLDB. This way, we can ensure that the registers set by the caller have not been tampered with by the time our breakpoint triggers.
To set a breakpoint on a function’s first instruction, we will need to know its address.
Use Xcode’s UI to set a breakpoint at the start of
viewDidLoad. This is okay since we only care about investigating thetestX(a:b:)functions.Run the project on your iOS device, and wait until the first breakpoint triggers.
Run
image dump symtab RevEngARMin LLDB to get the symbol table for theRevEngARMbinary. The output will look something like this:
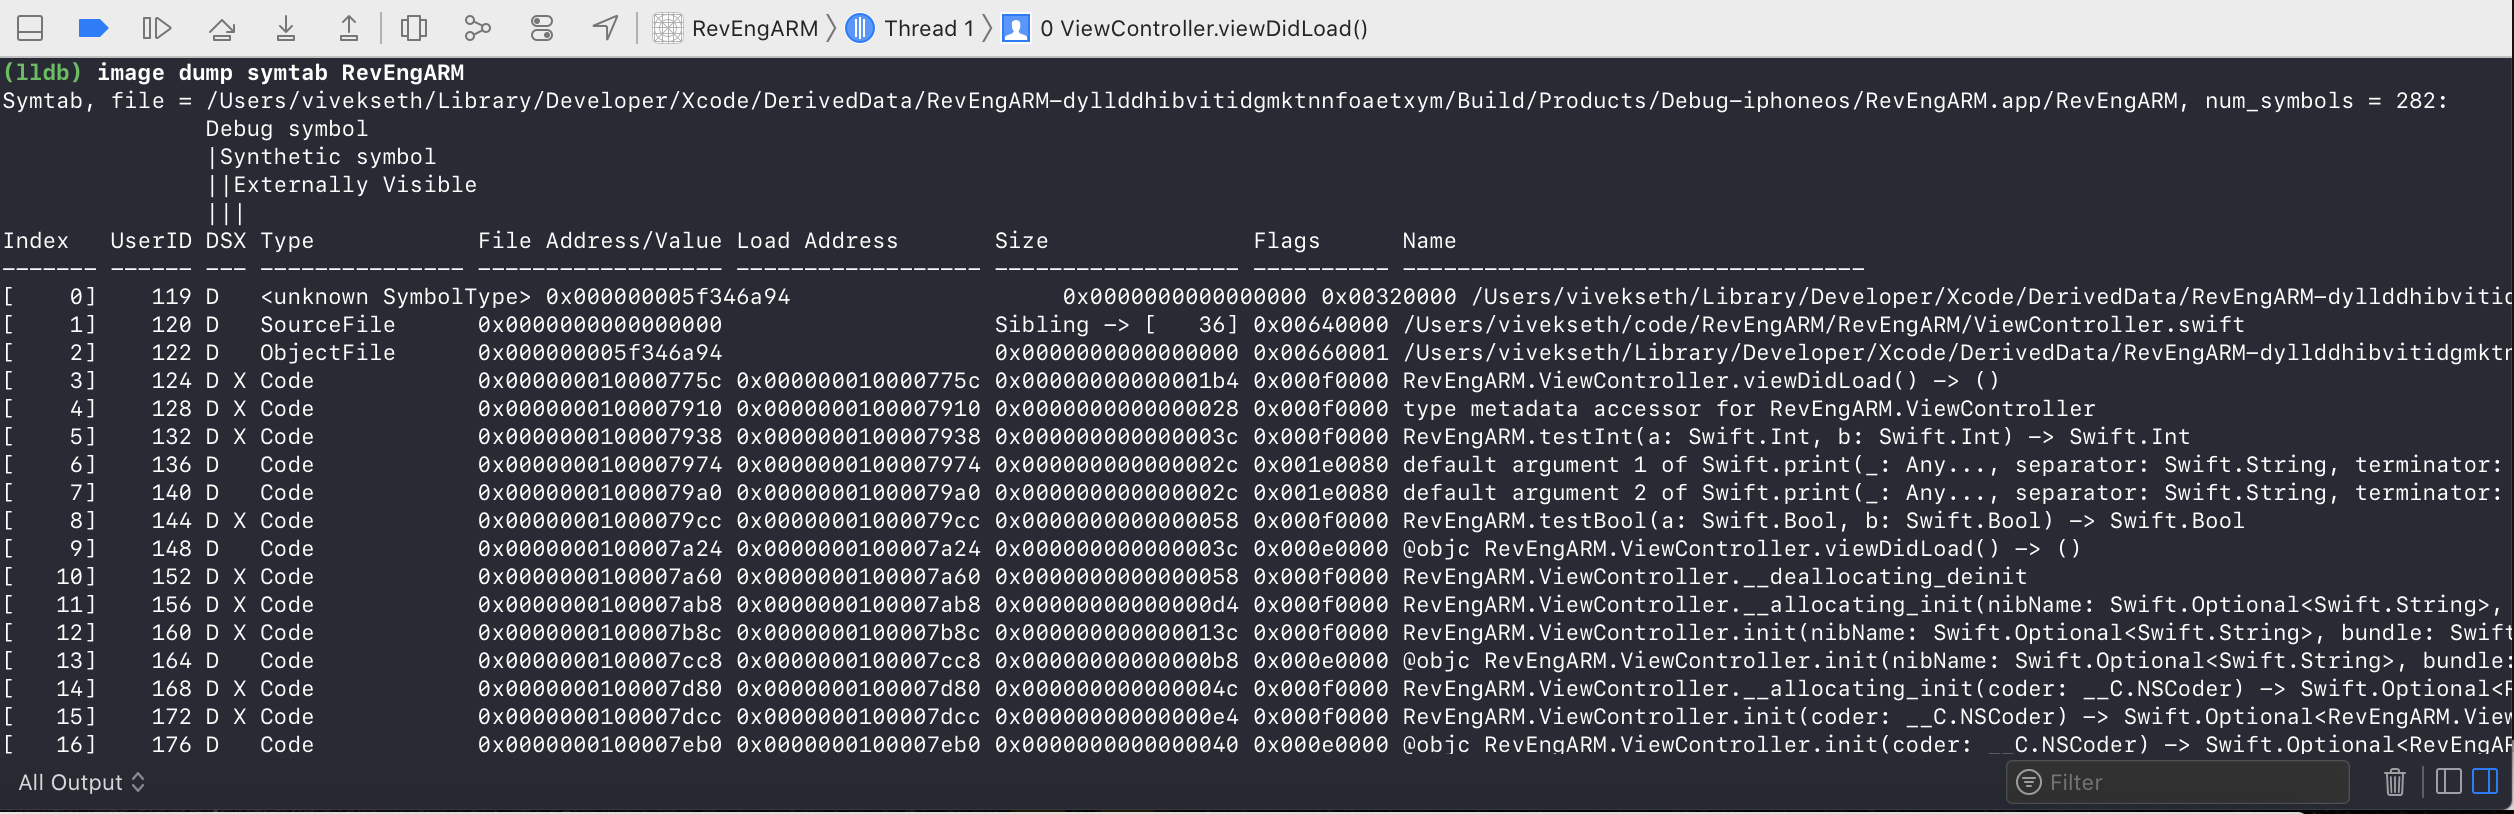
In the output, try to find the function
testInt. Using CMD+F might help.Copy the “Load Address”. In this case it is
0x0000000100007938.Run
breakpoint set --address <ADDRESS>in LLDB
If everything worked you should see something like this as the output:
Breakpoint 2: where = RevEngARM`RevEngARM.testInt(a: Swift.Int, b: Swift.Int) -> Swift.Int at ViewController.swift:19, address = 0x0000000100007938If you continue the project from the current breakpoint, LLDB should pause on the first instruction of testInt.
Int Calling Convention
Argument Values
According to the “Procedure Call Standard for the ARM 64-bit Architecture”:
The base standard provides for passing arguments in general-purpose registers (
r0-r7), SIMD/floating-point registers (v0-v7) and on the stack. For subroutines that take a small number of small parameters, only registers are used.
This means that the integer arguments to testInt will probably be stored in registers r0, and r1. Let see this in practice.
Follow the steps above, to place a breakpoint on the first instruction of testInt. Run the project until you hit the breakpoint.
According to the Procedure Call Standard document, r0 should hold the first argument. Let’s try it:
(lldb) register read r0
error: Invalid register name 'r0'.
That is because r0 just refers to the first register. Its name is actually x0 on ARM64. Let’s try it again:
(lldb) register read x0
      x0 = 0x0000000000000141
To display the value as a decimal you can use this:
(lldb) register read x0 -f d
      x0 = 321
Finally to confirm that the 2nd arg is stored in x1 we can simply do this:
(lldb) register read x1 -f d
      x1 = 654
Great! This is exactly what we expected. This confirms that Int arguments are stored in the registers x0-x8
Return Value
The “Procedure Call Standard for the ARM 64-bit Architecture” says:
If the type, T, of the result of a function is such that
void func(T arg)would require that arg be passed as a value in a register (or set of registers) according to the rules in §5.4 Parameter Passing, then the result is returned in the same registers as would be used for such an argument.
Essentially this says that the return value for a type T will be stored the same way that T would be stored if it were the first argument. For Int, this means that the return value will be stored in x0. Let’s verify this.
(lldb) thread step-out
(lldb) register read x0 -f d
      x0 = 975
Runing thread step-out will execute the rest of the instructions in testInt, and pause immedately after popping the call-stack. At this point, x0 should hold the return value, which we can verify by running register read.
Bool Calling Convention
Argument Values
Bool arguments work exactly the same way as Int arguments. Let’s verify it.
Just like before, follow the steps above, to place a breakpoint on the first instruction of testBool. Run the project until you hit the breakpoint.
Run register read x0 x1 -f B to verify that the registers hold the correct values. The argument -f B will force LLDB to print out the register values as a boolean value.
Return Value
Again, Bool works the same way as Int.
Run the following commands to view the return value of testBool:
(lldb) thread step-out
(lldb) register read x0 -f B
      x0 = true
Summary
For Int and Bool, Swift has a very simple calling convention. Arguments are stored in registers x0-x7, and the return value is stored in x0.
I hope this guide helped you understand Swift a little bit better, and helped make ARM64 assembly code a little less daunting. In my next article I will be covering Float, and Double which have a slightly different calling convention.
Troubleshooting
Make sure you use the approach desribed here to set breakpoints. Setting breakpoints using the UI or using
breakpoint set --name <func_name>may not work because LLDB may not pause the function on the first instruction. If other instructions execute, there’s a chance that the register values may get overwritten.Make sure you are running this code on a real iOS device. If you run this code on the iOS simulator, Swift will likely be running on a x86 CPU which has a different calling convention.
If something is still unclear or not working, I would be happy to help! Feel free to DM me on twitter or send me an email.